Tuesday, June 1, 2010

Speed painting


My first ever speed painting!
I've had the urge to go back to digital recently, so I figured speed painting is an exercise I've been wanting to try and let's me experiment with the new CS5 features.
Finally getting my hand into environments. I didn't focus too much on anything but mood, and just wanted to make it up as I went along. It's a freeing exercise and came out better than I expected.

Just have to figure out how to get the colors to translate properly to to a web friendly file, the colors are desaturated =\

Time: 25 min
PS CS5, Intuos 3


EDIT: Playing around with settings, have to test on other monitors, but looks considerably better already


Tuesday, April 6, 2010

Secret Places

I had to rush this to get it in time for judging, but I'm glad I did because it got accepted! It was assigned by my mentor depicting my secret place.

I'm going to clean it up the best I can before getting it framed. Certain things I would change if I had more time but it came close to how I had imagined it.


Friday, April 2, 2010

Walkthrough the Portrait of Hu Yaobang

I kept bothering my friend with quick webcam pics to ask advice, so I ended up with a general idea how I went through this process.
This is probably one of the more tedious undertakings but it was still enjoyable.


First- the flowers! So many flowers! Each one took quite a bit of time. The first took me two hours to figure out how I liked the design best.
They're white chrysanthemums- traditional at a chinese funeral.


Next, the portrait. I first did the portrait in pencil to size, then went over it in black marker where I planned to cut it out.
This is partway into cutting


This is the result with a white sheet of paper behind it so you can see it


Originally it wasn't supposed to be backed at all, but it was too difficult to see. I tried a number of colors and decided on yellow

We agreed it was missing something with just the flowers and the portrait, and needed something to soften the edges. So I added a frame and the yellow "drape"


Played with the layering and placing of flowers, and the final picture!


...actually I found an extra flower after this which I added. When I get back home I'll upload a better photo of the final ^_^

Friday, March 5, 2010

Petrushka

I've gone back to this theme because who doesn't love a sad clown? And it's nice to get more use out of that photoshoot.


I'm happy with the way this came out. I think I'm going to continue tweaking it so I can submit it to the senior show.
It's slightly lighter overall because all of the background tends to darken when printed.

Sunday, January 17, 2010

Despair continued

This is where I left off the end of the semester on this painting. It has been my most experimental oil painting and I'm still not sure where it's going but I'm pretty sure it's not done yet...
I still want to finish its partner, Fear but I'm taking a much needed break so I don't kill everything next semester.

Tuesday, December 1, 2009

Becky the Bunny

For my Workshop class personal project. It's illustrating a children's book that my friend came up with. I mean for each page to be 7" square, so this is a two page spread.
There are things I would fix (when is there not?) and the photographing was done quickly but overall I'm pretty happy with it. The background was a happy chance paper that I came across.
I tried mounting tape this time and that worked particularly well.


Monday, November 16, 2009

fartist


So I took a bit of a leap with the texture after becoming so frustrated after trying to glaze. The skin color looks a bit better in the picture than in real life in my opinion... And the color of the background is really more blue though... 


I'm happier with it than I was before, hopefully my
 prof agrees since I can't really change it back >.> Especially since it lost the light around the figure... 
I need to add the texture to between his arms, but I'm going to wait to add it until I'm done with the figure. 

add: okay, I fixed it a little so that some of the light comes through, now it looks like the flow is going around and in the shadows
(very rough quick shot from my webcam, will post better pics later)

Monday, November 9, 2009

I figure I might as well update whatever I'm working on that I don't want to hide in my basement in a dark corner.


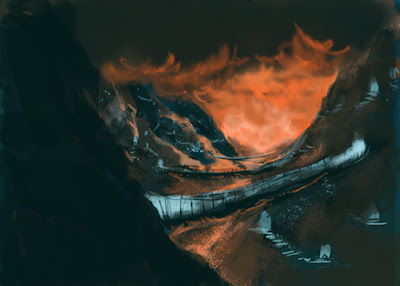
This is an oil painting for my advanced color class... 
I'm really not a painter and in general I have issues with color. So I'm hoping- all fingers and toes crossed- that this works out. 
I did the grisaille in flake white replacement and mars black first. I just added the second layer of glazing in sap green, though I don't think the first layer even counts because I think i did it wrong and it doesn't show up at all. Hopefully I'm doing this correctly because I'm winging it since I had no practical lesson on how to do it. I think some details that I painstakingly worked on got lost already when I had to strip off a layer of glazing even though it was dry... 

I also added texture to the background using liquin impasto. It's also my first time using impasto and it's not quite as stiff as I'd like and I had to try a couple of different techniques before I got this effect using a burlap-like textured paper and a palette knife. I think it was the best result with the plastic bag as a close second. We'll see what my prof says tomorrow. Still have to fig out what color I want in the bg. 

This is one of a pair, but I haven't started the grisaille of the other and don't expect it'll be done by the end of the semester. 

Experiment in Dragons


My (not-quite) finished piece for mentor class, an i
llustration of Bring the Painted Dragons to Life by Putting Pupils in Their Eyes


It didn't come out quite like I wanted, but it was a learning experience. I have a giant pile of paper in different shades and weights of green and red sitting around now, and I still wasn't quite prepared for how certain papers changed when glued down.

I didn't think to the scale part until near the end, and as result didn't finish in time -_- I'd like say I'll to go back and fix up this piece in the future, but chances are it'll end up in a corner and I'll have moved on to something else. The scales were done by punching out paper using a hole puncher and individually gluing them down using tweezers. Tedious but I like the effect.
Unfortunately because I was running out of time, I ended up rushing on the most important part- the head.
But I got some decent feedback overall. There are things that worked and others I realize don't photograph well at all. I've been looking at other sculpture artists and there are some different things I'd like to try.


Friday, October 30, 2009

Paper Love

I've only recently discovered my love for 3-D Collage, also called Paper Sculpture, though I've barely had any hand at it.
It has only been boosted by my recent purchase of this book:
Paper Sculpture: A Step-by-Step Guide

I can't wait to experiment and makes me excited to think about future projects. It's given me a more optimistic view of my future in art, because it's something I really enjoy and can imagine myself continuing where most other mediums never have. It makes me think this is what the 4 (well, technically 8) years of college were for.

My first attempt was with an experiment based on my previous knowledge of origami:
(encouraged my professor,
Peter Emmerich, which I will always be grateful for)

Since then, I've realized that while I would love to be able to, I just don't have the knack for formulating my own origami. So I've moved on to experimenting with cutting from a single sheet of paper....

My first experiment, cut from sheets of origami paper:
(ignore my ugly chipped nails)


And that lead to more experimentation, trying to make it more visible from a straight on angle...
One of my practice cuts for a class project, it's cut from a single sheet of Canford paper rather than layering separate pieces. If you can't tell it's (half) a dragon:


It was an enlightening experience, but I think in the end it still doesn't read well enough from photographs even though I think it looks pretty cool in person.
I want to try layering, coloring edges, and curling next.

Lesson of the day: It is foam board that they use to create depth! Or double-sided foam tape, which I think is kind of ingenious but probably less archival in the long run. Must go out and stock up.